Hoop Crafting Instructions
How to Make a Hoop
This can be a very simple and fun activity. The materials cost of making a hoop works out to about $16 a hoop, but you will likely have enough materials to make several. If you’ve never made a hoop before, and you don’t have anyone walking you through the process, there can be a bit of a learning curve. I’ve included a couple of common mistakes at the bottom of the page.
WHAT YOU’LL NEED
- Tubing
- Connectors
- Hair dryer or hot water
- Hacksaw or PVC cutters
- Tape
TUBING
The best tubing is the black irrigation tubing that generally comes in 100ft coils. You can find this in just about any Lowe’s or Home Depot, but if you’re having trouble getting it there then try your local irrigation supply store. The coils run about $50 a pop, but you can get quite a few hoops out of this.
Most hoopers get either 100 or 160 psi, and either ¾” or 1” diameter. The psi determines the thickness of the tube walls, so the 160 will be thicker and ultimately heavier. If you want a light hoop, go for the ¾” 100 psi. If you want a heavier hoop, go for 1” 160 psi. Be advised that the heavier the hoop, the more likely it is to bruise if you spin for extended periods of time.
HACKSAW or PVC CUTTERS
Either one will work. PVC cutters are safer, quicker, and leave a cleaner cut. However, if you already have a hacksaw that will work just fine. Please be careful when using a saw. Always be aware of where your fingers and limbs are, you don’t want to pull back too hard on the saw and end up slicing your leg. Awareness is key here!
CONNECTORS
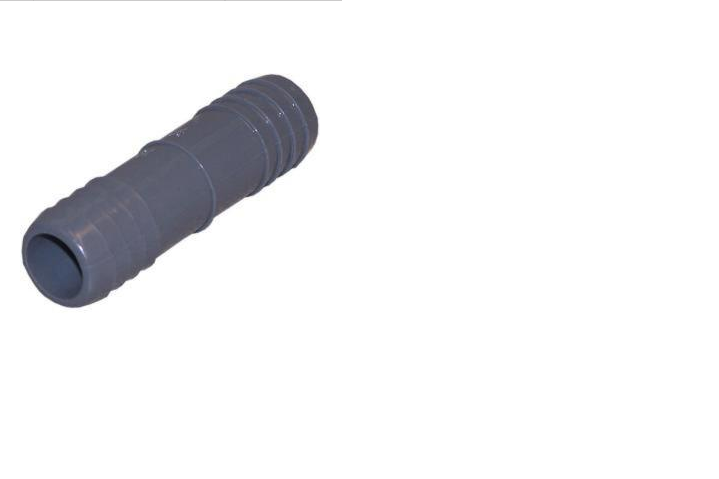
There are about a million connector options at the hardware store, but only one will work for you. You want the plastic grey connectors that match the diameter of your tube. So if you chose ¾”, you want a ¾” connector. The metal connectors will throw the weight of your tube off, and I haven’t been able to find a white plastic connector that works. So take the time to seek out the GREY connector that looks like this: 
You will be glad you did.
HAIR DRYER (OR HOT WATER)
In order to get the connector in the tube you will need to heat it up a bit. A hair dryer works great for this, concentrated about a minute on the end of the tube. You need to work fast, as the tube will quickly lose heat and shrink to its original size and you won’t be able to get the connector in. I typically heat one side, put the connector in halfway, then heat the other side. As the tubing cools it will contract around the connector.
If you don’t have a hair dryer, put the ends of the tubing in a pot of boiling water. It will do the trick just fine. Try to avoid open flames if you can or you may end up with a melted tube.
TAPE
The most fun ingredient! For tips on how to tape a tube and which kind of tape to use, please refer to this page.
INSTRUCTIONS
- Determine your hoop size.
Typically, you will want a hoop that stops anywhere between your naval and solar plexus. The bigger the hoop, the easier it will be to keep up. For very beginners, we would recommend a hoop that stops at least two inches above your belly button. Also take your waist size into consideration. A bigger waist doesn’t mean you won’t be able to hoop, but you will likely need to err on the bigger size hoop.
- Mark Your First Cut.
This isn’t crucial but is very helpful when making your first cut. The tubing is floppy and will only stay in position while you cut if you’re holding it. It is easier to focus on cutting if you don’t have to wrestle the tubing into place in order to remember where you need to cut.
- Make your cut
Using either a hacksaw or PVC cutters, make your cut. Remember to do this as safely as possible! For tips on cutting with a hacksaw click here.
- Smooth the Cut
If necessary, take some sandpaper over the cut to smooth it down a bit. Any stray pieces of plastic will potentially show through the tape, so you want it to be as smooth on the outside as possible.
- Heat the ends of the tubing
Using either a hair dryer or boiling water, heat the ends of the tubing. This makes them moldable. If your connector is not going completely in the tube, heat it some more.
- Place the connector in the tube
If you’re using a hair dryer, it’s easiest to do one side at a time. If boiling water, you can do both at once.
- Wrap the connection with duct tape
Not a crucial step, but it is just a bit of added security for your connection. Try to make sure the duct tape is as smooth as possible, without ridges or bumps, as these will show through your decorative tape and throw off your angles.
- Tape your hoop!
This is potentially the most fun but also the most frustrating step. The more you do it, the better you will be. For tips on choosing tapes, click here.
Voila! Beautiful, spin-ready hoop.
